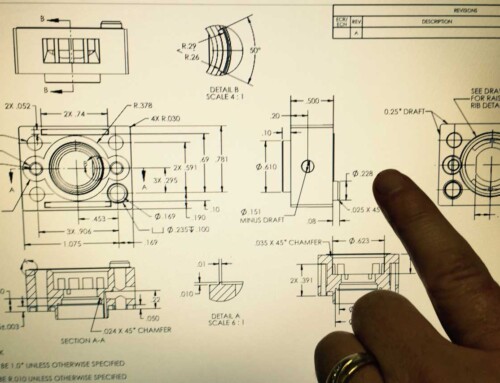
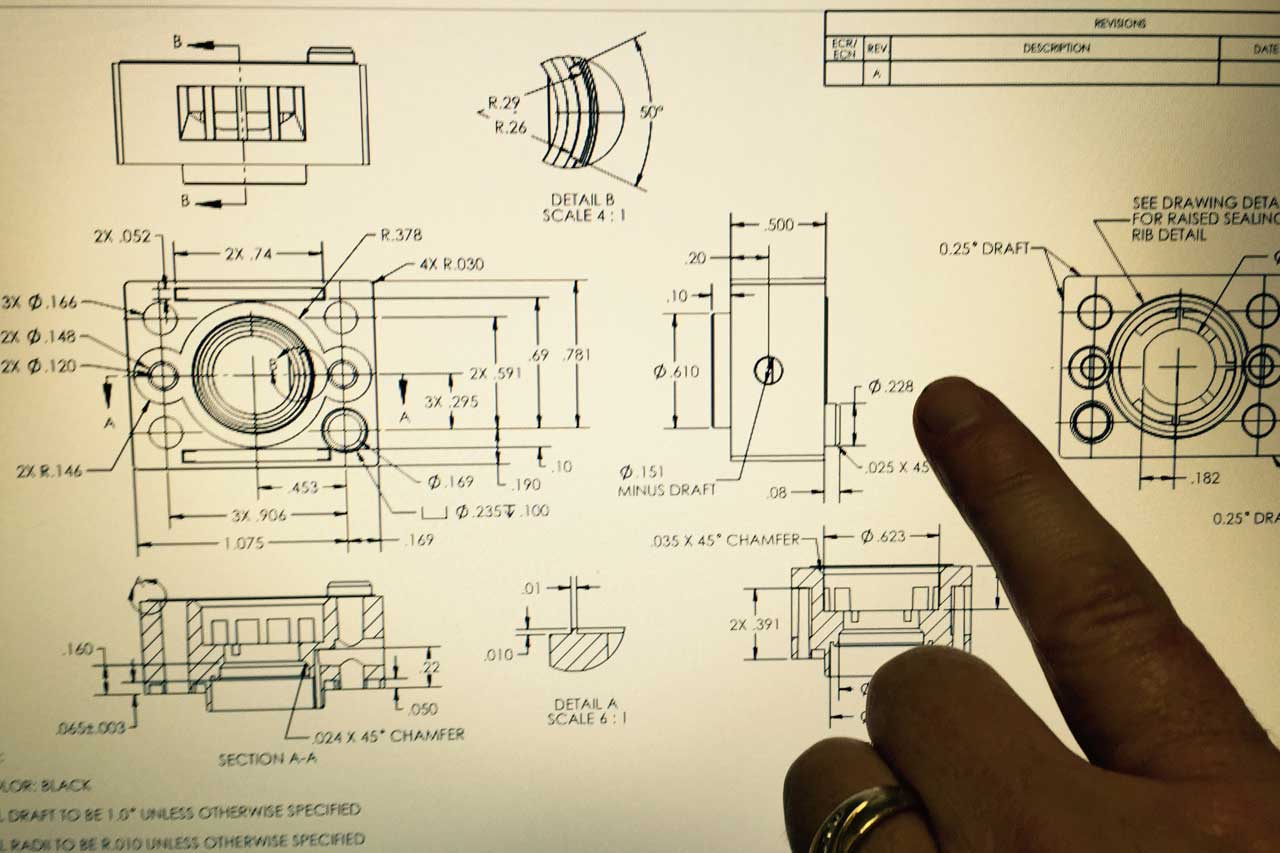
Plastic injection molding design plays a very important role in plastic parts manufacturing, it can directly decide whether your projects can run smoothly. A good plastic injection molding manufacturer with excellent plastic injection molding design ability can not only help you reduce the plastic injection molding cost, but also save a lot of time. Here is a pricing guide for China plastic injection molding, if you are interested in China plastic injection molding costs, you can check it.
There are many ways through which plastic goods are mass-produced, such as casting, extrusion, fabrication, and compression molding are some of the processes through which plastic can be reshaped. Injection molding is also a process that is used for manufacturing plastic goods.
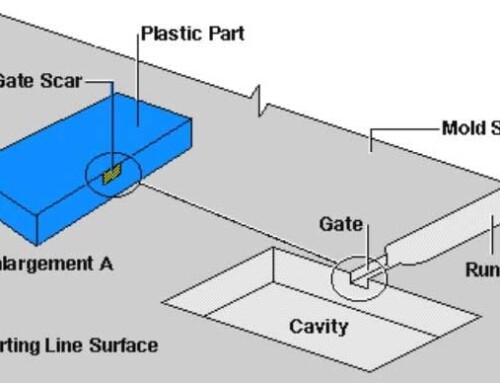
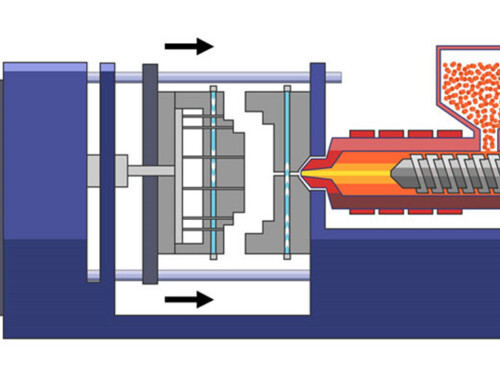
1. What is Injection Molding?
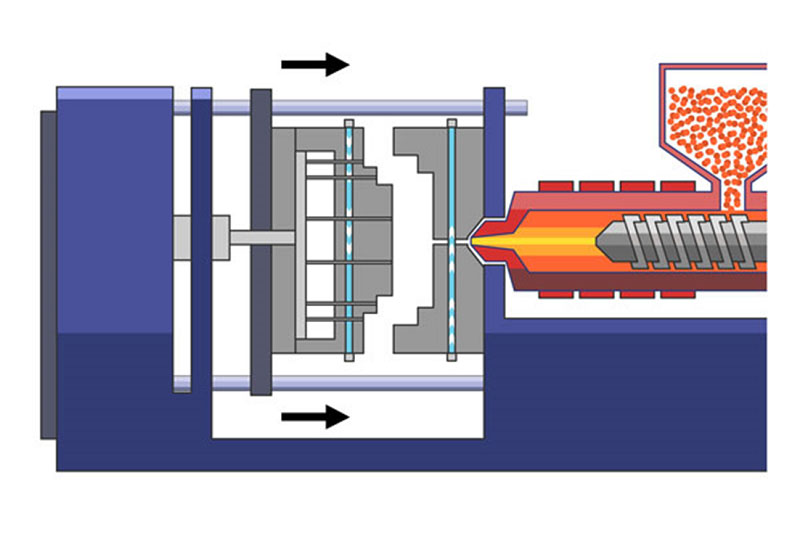
In simple words, the process of injecting a heated substance into a mold to shape plastic goods is known as injection molding. But it isn’t as simple as it sounds. This process involves the melting of polymer granules which are then injected into a mold using pressure. Once injected, the polymer liquid solidifies when it cools down.
The mold used in injection molding has two halves. These are separated from each other. Once the plastic component solidifies, it can be separated from the molds easily.
This process uses the latest technology and is specially used to manufacture identical plastic parts. However, it has become popular in the manufacturing industry due to its cost-effectiveness. Low cost per unit is very important when there is a mass production requirement.
2. Design Guidelines for Injection Molding
When we talk about injection molding, there are certain rules and guidelines we must follow, for an effective and efficient outcome.
1. Make use of Draft Angles
Draft angles are necessary for the plastic to be removed easily from the mold. Each vertical wall should have a draft angle to ensure that there are no drag marks on the wall surface. It is observed that when draft angles are not added to these molds used in injection molding the wall of the molds has drag marks due to the high friction.
For shorter features, we would recommend a 3° degree draft angle whereas for a taller feature a draft angle should be up to 50° degree. For a more accurate and precise outcome, increase the draft angle by 1° degree for every 25mm.
For parts that have a textured surface finish use a larger draft angle. Draft angles are necessary for ribs. You need to make sure before adding a draft angle, whether the minimum wall thickness fulfills your design requirements. This is because adding a draft angle would reduce the thickness of the rib.

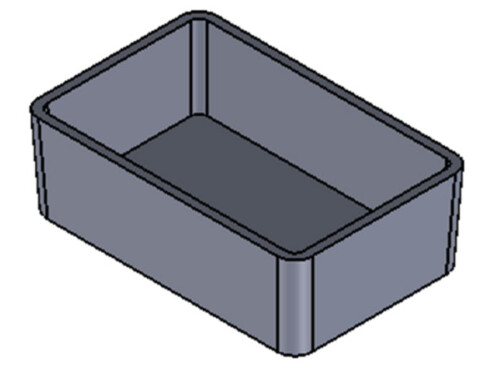
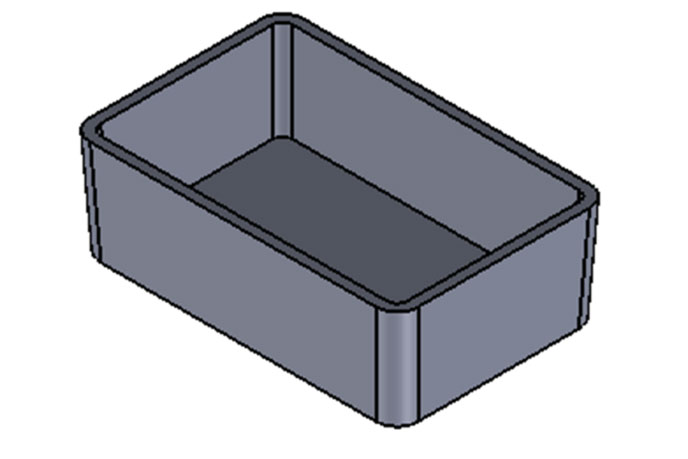
2. Even Wall Thickness
When using injection molding for mass production of plastic goods, it is important that you use the same wall thickness throughout the part. This is very important because if the walls are uneven then this could lead to warping when the melted plastic substance cools down.
The average wall thickness should be between 1.2 mm and 3 mm. This applies to most of the materials. However, wall thickness often depends on the type of material used. For instance; if Polypropylene is used, the wall thickness should be between 0.8mm and 3.8mm.
A chamfer or fillet can come in handy to smoothen the walls that have a 3x difference in length and thickness.

Wall thickness recommendation for the most common plastic materials:
| Material | Recommended wall thickness [mm] | Recommended wall thickness [inches] |
| ABS | 1.2 – 3.5 mm | 0.045” – 0.14” |
| Nylon (PA 6) | 0.8 – 3.0 mm | 0.03” – 0.12” |
| PC/ABS | 1.2 – 3.5 mm | 0.045” – 0.14” |
| PEEK | 1.0 – 3.0 mm | 0.04” – 0.12” |
| Polycarbonate (PC) | 1.0 – 4.0 mm | 0.04” – 0.16” |
| Polyethylene (PE) | 0.8 – 3.0 mm | 0.03” – 0.12” |
| Polypropylene (PP) | 0.8 – 3.8 mm | 0.03” – 0.15” |
| Polystyrene (PS) | 1.0 – 4.0 mm | 0.04” – 0.155” |
| Polyurethane (PUR) | 2.0 – 20.0 mm | 0.08” – 0.785” |
| POM (Delrin) | 0.8 – 3.0 mm | 0.03” – 0.12” |
| Silicone | 1.0 – 10.0 mm | 0.04” – 0.40” |
3. The edges should be Round
The edges and corners should be round and even. The final product should be as smooth as possible. The radius for interior edges should be at least 0.5 multiplied by the wall thickness. Whereas for exterior edges, the radius should be equal to the sum of the radius and wall thickness of the interior edges.
This would result in a smoother end product that has uniform wall thickness and round corners. However, round edges are necessary in order to avoid sharp edges. A part that has sharp edges would be weaker as compared to a product with round and smooth edges.

4. Thick sections Should be hollowed out
It is very essential to hollow out the thick sections of the part as it would lead to various flaws in the product. This would include, warping and sinking. The thickness of any section of your design has to be limited to the recommended values. This would be done by hollowing them.

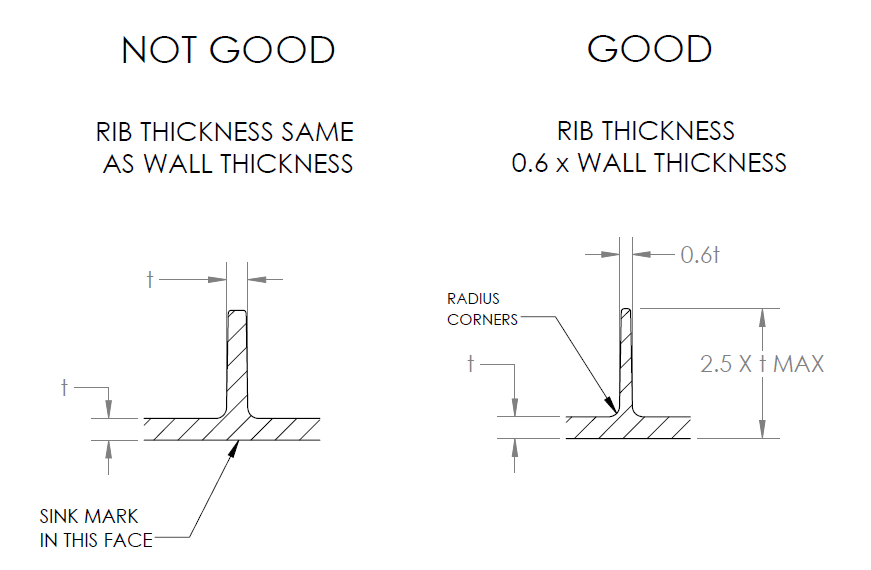
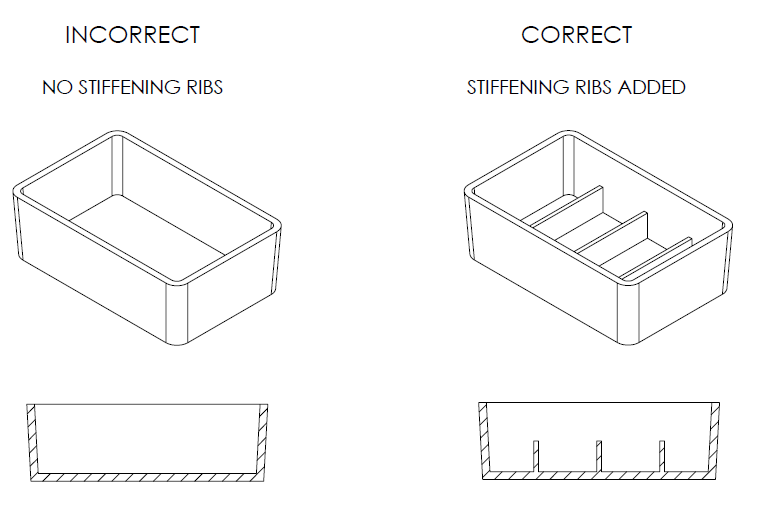
However, in order to improve the structure and strength of any hollow section, you need to use ribs for designing equal structures with equal strength and stiffness. But ensure the wall thickness is reduced.
Ribs are very useful in improving the stiffness of the horizontal sections. They do so without affecting the thickness of these sections, which is why they are recommended. Make sure you do not exceed the recommended rib thickness as this would result in sink marks.
5. Add Fasteners carefully
Fasteners can be added to an injection molded part in 3 ways:
- By adding a thread
You can add a fastener to the part by modelling a thread on the part. However, this would be very expensive and would increase the complexity of the entire structure.
- By adding a Boss
Another common method for adding a fastener to the part is using bosses. A Boss turns out to be a good fastener and is commonly used for attachment and assembly. It is of a cylindrical shape with holes. These holes are designed to attach screws, and threaded inserts.
It is important to know that the boss that is being used for fastening has an outer diameter of 2 times the diameter of the screw or insert that is to be attached. Whereas, the inner diameter of the boss should be equal to the screw’s core diameter. Make sure that the hole is extended to the base wall level of the boss. This is important in order to maintain the wall thickness throughout the part.

- By adding an insert
The third way to fasten a plastic molded part is to add a metal threaded insert. This has proven to provide a durable hole. Let’s take machine screws for example. Metal threaded inserts are very beneficial as they provide many cycles of assembling and disassembling. These are installed in an injection molded part by ultrasonic, thermal, or in-mold insertion.

6. Snap-fit Joints
A simple, fast, and economical way of joining two parts without using any fasteners or tools is by using snap-fit joints. There are many designs available for snap-fit joints. For a part design that has ribs, you should add a draft angle to the snap-fit joint with a thickness of 0.5 times the wall thickness.
The length and width of the snap-fit joint define how much force should be applied to bend it. The width of it depends on how much is its wall thickness. Undercuts are known as snap-fit joints.

3. Some features that would enhance the design of the parts in Injection Molding
- Text
For designing branded products text in the form of logos, labels, warnings, diagrams, and instructions are very important. It saves the additional expense of painted and stick-on labels. You can choose between embossed or engraved text and create a unique product. This turns out to be more economical as it is easier for the CNC machine to mold.
Text is added to the plastic parts by raising the text 0.5mm above the surface. This will enable the letters to be readable. You can choose a bold font style that has rounded and even lines. The size of the font should be at least 20 points. You can choose between various fonts including Arial, Verdana, and Gothic Bold.
- Crush Ribs
In order to manufacture parts that have high tolerance holes, crush ribs are a good option. Crush ribs are small expanded features that are deformed to create friction. Crush ribs create friction when different components are pushed together. Most commonly, these are used for house bearings and shafts.
For a good alignment, we recommend 3 crush ribs. Each rib should be of 2mm height or radius. Make sure you add a 0.2mm interference between the ribs and the fitted part.
 fit of a component to a moulded part")
Living Hinges
For containers, such as plastic bottles, living hinges are produced. They are thin sections of plastic that are used to join or connect two segments of a plastic part. Living hinges are typically used because they allow the part to bend and be flexible.
The durability of the living hinges depends on the material used for making them. A well-manufactured living hinge could last for million cycles. For consumer choices, living hinges made of Polypropylene and Polyethylene are preferred. Whereas, for engineering use Nylon is more suitable. It all depends on how flexible the living hinge is.

Surface Finishes
For the part to look and feel good, a certain type of surface finish can be added to it. A surface finish can not only make it look better but also increase the durability of the part. There are various types of surface finishes available that you could choose from. These include; glossy finish, semi-gloss finish, matte finish, and textured finish. Each finish has its own unique characteristic.
| Finish | SPI standard | Finishing Method | Typical surface roughness Ra (μm) |
| Super High Glossy finish | A-1 | Grade #3, 6000 Grit Diamond Buff | 0.012 to 0.025 |
| High Glossy finish | A-2 | Grade #6, 3000 Grit Diamond Buff | 0.025 to 0.05 |
| Normal Glossy finish | A-3 | Grade #15, 1200 Grit Diamond Buff | 0.05 to 0.10 |
| Fine Semi-glossy finish | B-1 | 600 Grit Paper | 0.05 to 0.10 |
| Medium Semi-glossy finish | B-2 | 400 Grit Paper | 0.10 to 0.15 |
| Normal Semi-glossy finish | B-3 | 320 Grit Paper | 0.28 to 0.32 |
| Fine Matte finish | C-1 | 600 Grit Stone | 0.35 to 0.40 |
| Medium Matte finish | C-2 | 400 Grit Stone | 0.45 to 0.55 |
| Normal Matte finish | C-3 | 320 Grit Stone | 0.63 to 0.70 |
| Satin Textured finish | D-1 | Dry Blast Glass Bead #11 | 0.80 to 1.00 |
| Dull Textured finish | D-2 | Dry Blast #240 Oxide | 1.00 to 2.80 |
| Rough Textured finish | D-3 | Dry Blast #24 Oxide | 3.20 to 18.0 |
4. How to deal with Undercuts?
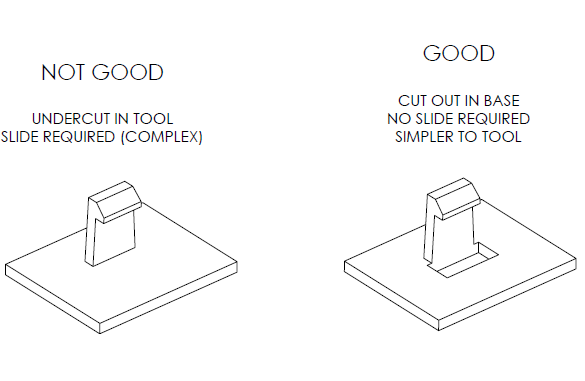
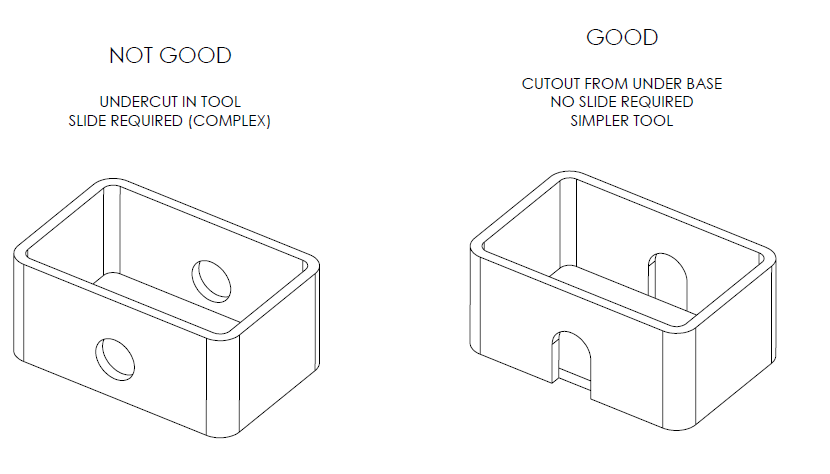
Undercuts could be really difficult to deal with as they contribute in cost, complexity and maintenance. In order to be able to deal with undercuts, you can either avoid them by using shutoffs, or use a stripping undercut instead, or use sliding side actions and cores.
1) Stripping Undercut
Stripping undercuts, commonly known as bump offs can be used instead of regular undercuts. These are mostly used in the manufacturing threads in bottlecaps. However, there are certain limitations for bump-offs to be used. In order to use a stripping, undercut, it is essential that is located away from the hardening feature. For example, the corners and the ribs. It should have a lead angle of 30° to 45° degrees.
We do not recommend stripping undercuts for parts that are made of fiber-reinforced plastics.

2) Sliding Side- actions
When there is no possibility to redesign the injection model part to avoid undercuts, there is an option of using sliding side-actions and cores. These are inserts that slide in when the mold closes and respectively slide out when the mold opens.
These would of course add to the cost of the final product but would be helpful in avoiding the undercuts. However, it is best to avoid undercuts altogether by removing material in the area underneath it.

5. Conclusion
Injection molding is a cost-effective approach and this why it is one of the most popular manufacturing processes regarding plastic parts. However, there are certain things you must remember regarding injection molding. These include:
- 1) Finalizing your plastic injection molding designs before you go for injection molding.
- 2) Prototyping with the use of 3D printing or CNC machining.
- 3) Keep a uniform wall thickness
- 4) Make sure the edges and corners are rounded.
- 5) Increase the strength and stiffness by adding ribs.
- 6) Avoid undercuts
- 7) Use a surface finish that improves the quality of the part.
