Plastic injection molding is a manufacturing technology that easily works with plastics, which enables mass production of identical plastic material or parts. With the help of injection molding, the plastic parts which are produced are the same and have the same design and dimensions.
The first and the most important thing to do before starting the designing process is to make sure that all the materials are prepared. Then you should make sure that there are no doubts or confusions present regarding the structure or the design of any of the parts. Everything is ok, you can start the practical process of designing the plastic parts for injection molding.
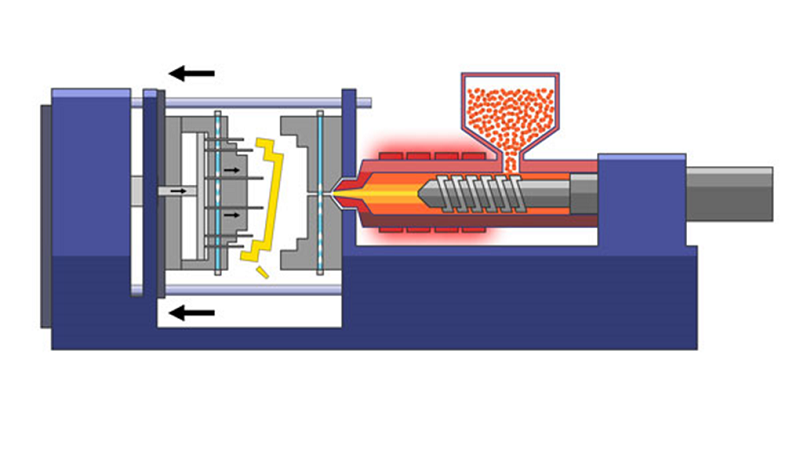
The process includes inserting the plastic in the molten form into the mold cavity, which has been designed following the requirements of the part. The steps to design plastic parts for injection molding are as follows:
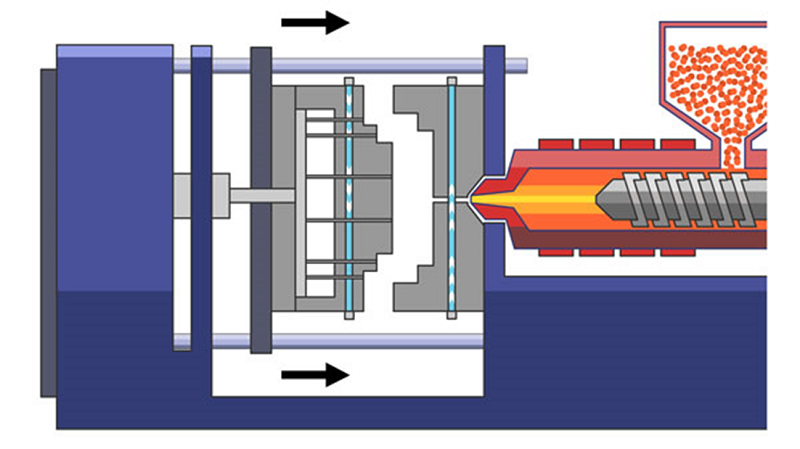
STEP 1: THE MOLD CLOSES
This is the first step that takes place right after the design has been finalized and the material has been gathered to conduct the process. The initial step involves the creation of the mold which needs to be used. This mold is following the design or the planned structure which is needed. Once the mold is ready the machine closes the mold. The closing of the mold means that the design is final and that there are no further changes required in the structure or the dimensions of the mold and that all the plastic parts will be created just like this mold.
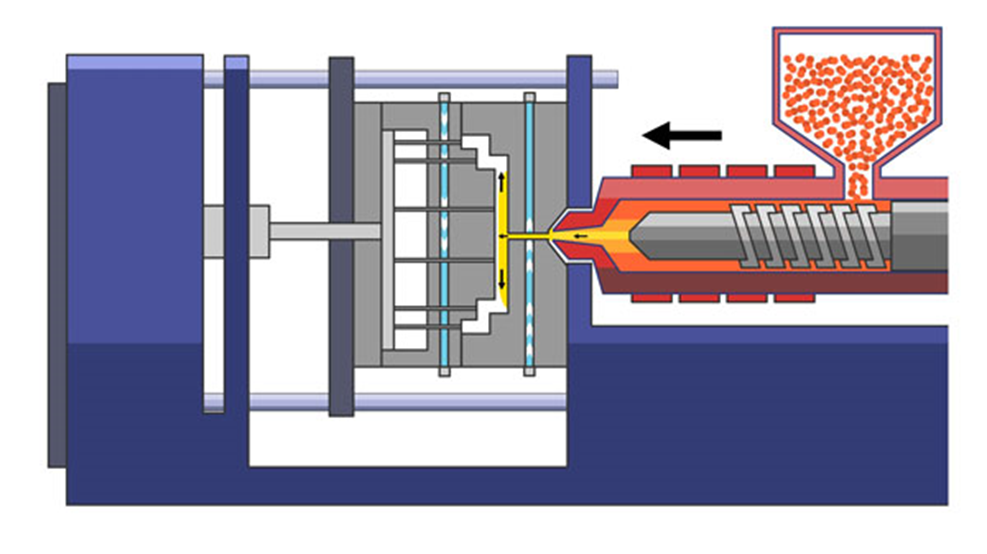
STEP 2: INJECTION
The second step is known as the injection step. In this step, the material being used is added to the machine or the mold. The material being used which is plastic in the liquid state is added to the machine which conducts the process. Once the liquid plastic is added to fit the mold closes. The mold is of the design of the part which is desired in the plastic material. The mold closes in an airtight manner such that there is no passage of air or any other medium through it. This is done to make sure that the exact or the intended design is replicated on the parts which are to be created through the molding process. The liquid plastic is heated in this step and becomes hot.
In this step, the plastic which is quite hot is then injected inside the mold. Once the liquid plastic is added to the mold and it closes the next step which is the second step of the process begins. Basically, in the second step, the heated or boiling kind of liquid plastic is injected inside the mold. As soon as the molten plastic enters the mold it starts taking the shape of the mold.
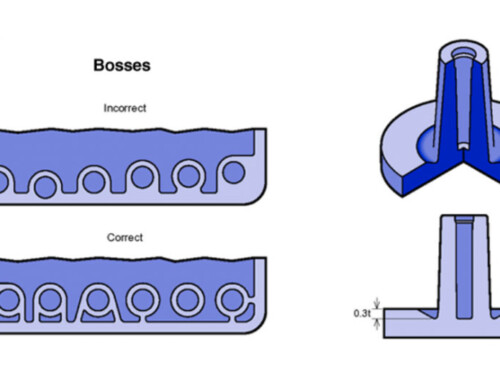
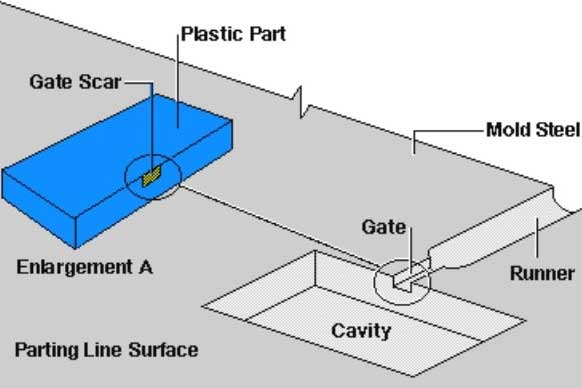
The extra air or the displaced air passes through the various vents which are present in the injection pins along the different parting lines. The overall runner, vent, and gate design of the molding machine play a vital role in the shape of the final product. It is important to make sure that the mold is full.
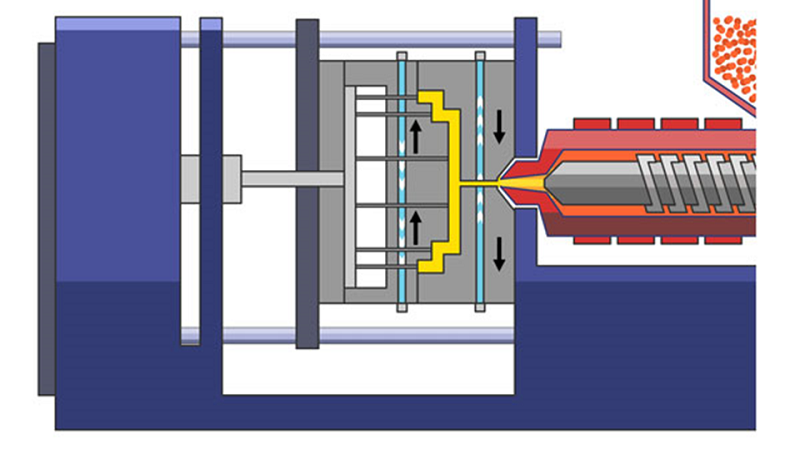
STEP 3: COOLING
The third step of the process is known as the cooling step. In this step, the liquid plastic which was filled in the mold is cooled down. As the liquid was quite hot in the previous step which was made that way to make sure that the plastic parts being formulated take the exact shape of the required mold and that the design and the shape of the parts are accurate. Now in this step, the same liquid is cooled down, this is down so that the shape can stay permanently and that the liquid plastic can ultimately turn into a solid.
The main aim of the whole process is to attain solid parts. The liquid is allowed to cool down for as long as required. The cooling process is only stopped when the liquid hardens. All the molds used have their internal heating and cooling lines therefore, the process becomes quite easy. Water is cycled through these lines. These lines and the water which pass through them make sure that the required temperate is maintained and is kept constant.
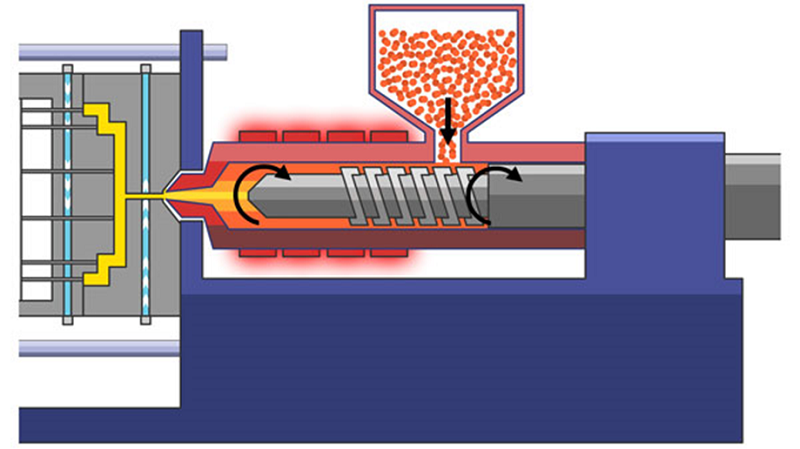
STEP 4: PLASTICIZING THE RESIN
The fourth step is known as plasticizing the resin. In this step, the barrel screw retracts and at the same time draws the new plastic resin. The new plastic resin is taken into the barrel from the machine`s part known as the material hopper. This process is done side by side while the previous parts are being cooled down. The heater bands continue to maintain the temperature required in the barrel to assist the resin which is being used.
STEP 5: EJECTION
The fifth step is known as the ejection step. In this step, the mold is made to open up. The ejector removes forward in such a way that the ejector pins allow the mold to open. Therefore, the parts fall open in this step. The material dispatched as the result of this opening or ejection is collected in a bin which is located right below the mold.
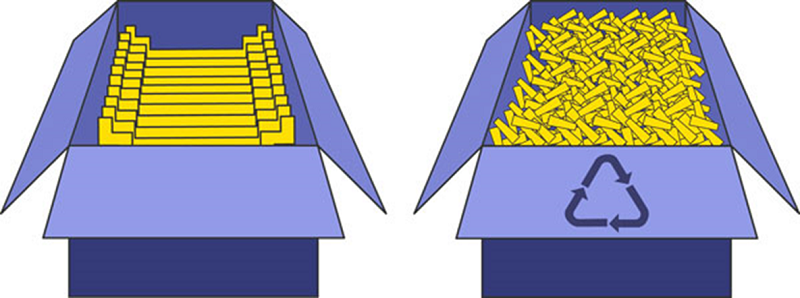
STEP 6: REMOVING THE RUNNER AND PACKAGING
The sixth or the final step of the process of designing plastic parts is called the removing the runner and packing. In this step, the injection molding machine ends its cycle. Now the remaining or the unused parts which are considered the leftovers are removed from the runner. This is done so that the machine does not have any issues working in the future, as the unused plastic can cause errors in the operation of the machine is left there for good.
It can block the pathway of the mold cavity and cause errors in future designs. At times the leftover plastic is recycled and reused to contain the cost and reduce the environmental damage. The remaining parts are weighted and then packed to ship off to the waste department or for reuse purposes.
It can be concluded that the whole plastic injection molding process consists of the above-described steps. If the steps are followed properly the results are very precise and accurate. As the steps are easy to follow and conduct the process has been become quite popular throughout the world and is being used to create plastic parts for different things.
